 RA8D1加密引擎功能体验和实践
作者:sx
01 资料准备
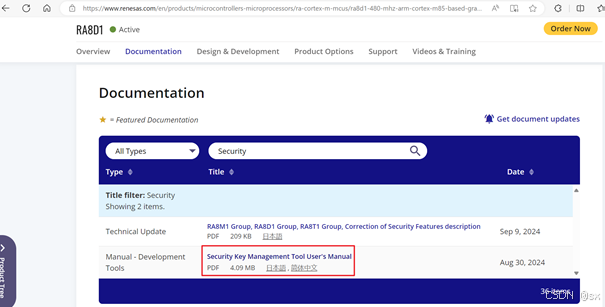
01Security Key Management Tool用户手册
RA8D1产品页面https://www.renesas.com/en/products/microcontrollers-microprocessors/ra-cortex-m-mcus/ra8d1-480-mhz-arm-cortex-m85-based-graphics-microcontroller-helium-and-trustzoneDocumentation条目可以找到并下载到《Security Key Management Tool User’s Manual》,文档链接:https://www.renesas.com/en/document/mat/security-key-management-tool-users-manual
02Security Key Management Tool安装程序
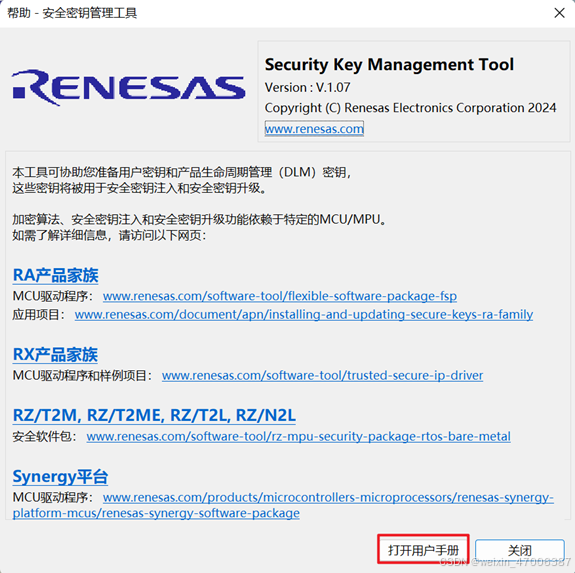
阅读文档可知,瑞萨提供的工具名为Security Key Management Tool,可以在官网首页搜索Security Key Management Tool。
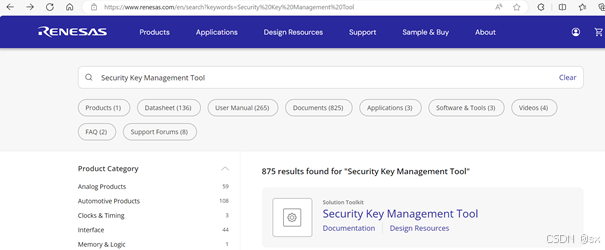
进入Security Key Management Tool主页,在Downloads类目可找到:
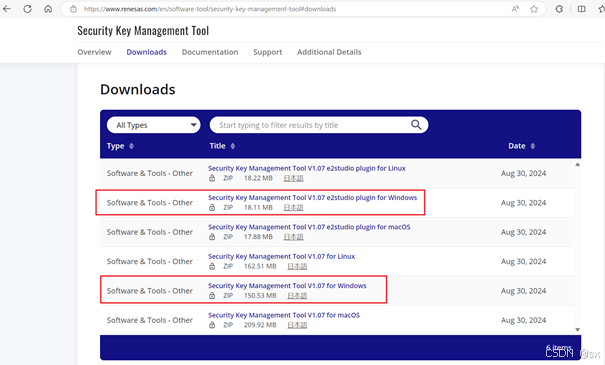
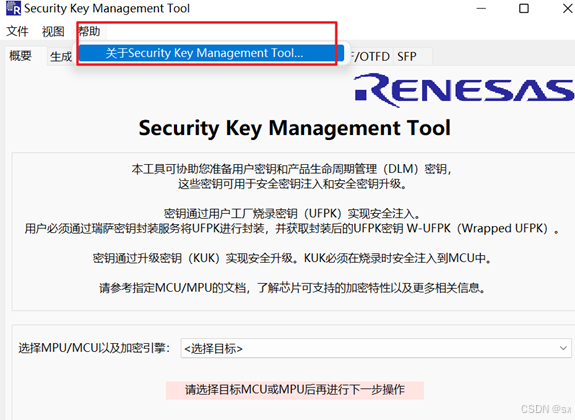
为了方便使用,本次使用了Security Key Management Tool V1.07 for Windows,点击链接即可下载。下载完执行安装即可。安装完打开此工具,点击菜单栏“帮助”->关于Security Key Management Tool,在弹出的“帮助-安全密钥管理工具”下找到“打开用户手册”按钮,可以找到第一步所述的用户手册,中文版本 。
03其他文档和链接
3.1Renesas DLM在线服务系统
在Security Key Management Tool生成UFPK(用户工厂烧录密钥)后,界面提示需要登录Renesas密钥封装服务页面:
https://dlm.renesas.com/keywrap/
首次使用需要注册->交换GPG key,具体过程在下一步FAQ中获取的Manual有详细描述,由于是首次使用,在这一步花了些时间。
注册并登录后可以通过FAQ->“Is there a manual of this system?”获取系统使用帮助。
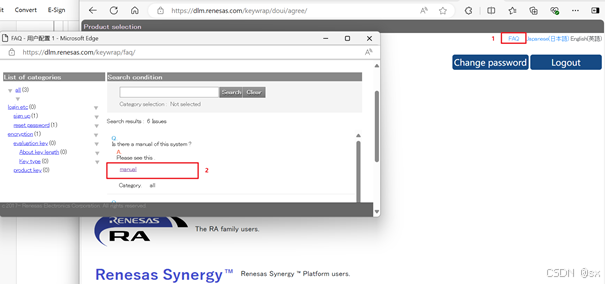
具体链接:https: // dlm. renesas. com/ manual/ KeyWrap_ Service_ Operation_ Manual. pdf
3.2基于RA芯片的应用手册《Injecting and Updating Secure User Keys》和示例代码
https://www.renesas.com/en/document/apn/injecting-and-updating-secure-user-keys-ra-family-application-project

关于RA系列产品SCE操作模式
https://www.renesas.com/en/document/apn/secure-crypto-engine-operational-modes-application-note#:~:text=The+Secure+Crypto+Engine+9,Compatibility+Mode+and+Protected+Mode.
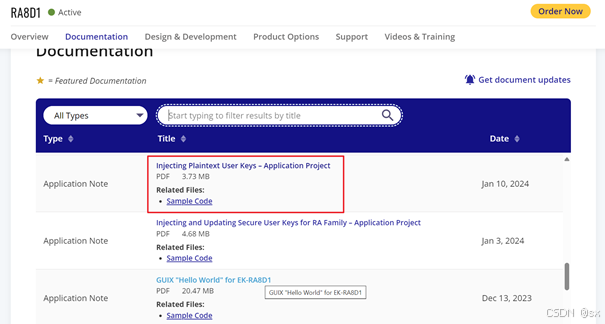
3.3基于RA芯片的应用手册《Injecting Plaintext User Keys》和示例代码
https://www.renesas.com/en/document/apn/injecting-plaintext-user-keys-application-project?r=25456556
3.4FSP v5.0.0和FSP v5.5.0
FSP v5.0.0可配合上面2,3小节的Demo,无需更改调试配置;
FSP v5.5.0包含第二节所述例程,默认安装e2studio 2024.07版本会自动安装好FSP v5.5.0,此种情况如果要增加v5.0.0可以下载FSP Pack v5.0.0进行安装。
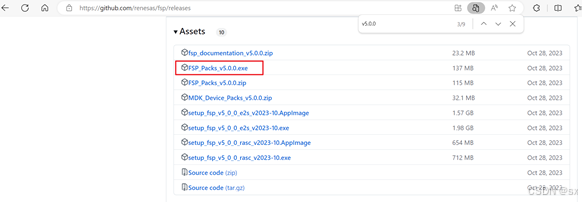
RA8D1产品页面FSP:
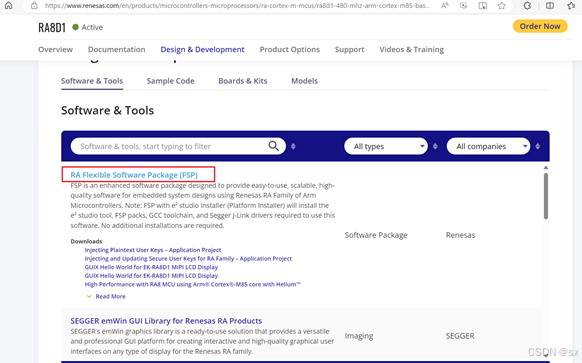
FSP github路径:
https://github.com/renesas/fsp/releases
4.5RA8D1官方例程
https://www.renesas.com/en/products/microcontrollers-microprocessors/ra-cortex-m-mcus/ra8d1-480-mhz-arm-cortex-m85-based-graphics-microcontroller-helium-and-trustzone?sam_secondary=visible#design_development
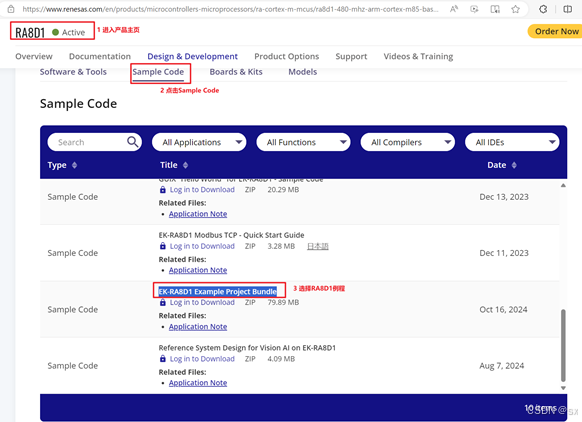
使用这里的示例"mbed_crypto_ek_ra8d1_ep"与所述前“Injecting and Updating Secure User Keys”基本相同。
也即,如前述应用手册对应代码未下载,直接用这个工程也可完成AES密钥封装验证。
02 准备工作
01SKMT生成所需文件
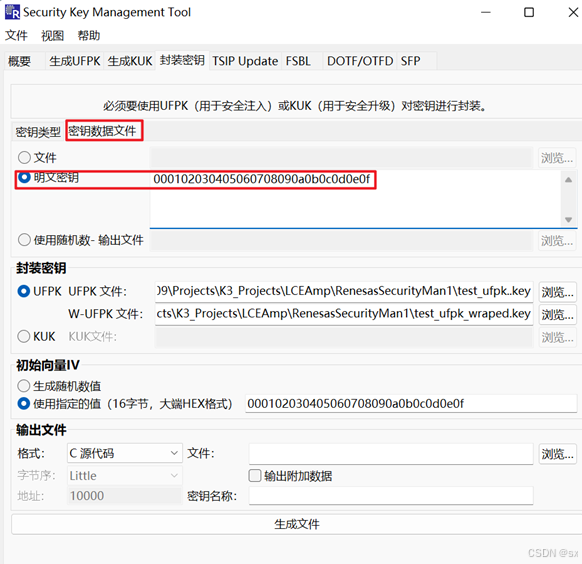
1.1 打开Security Key Management Tool
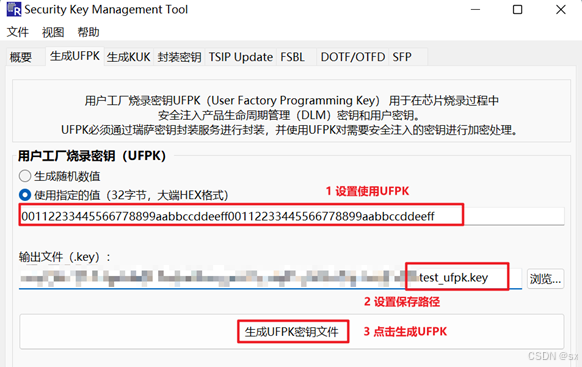
设置如上图UFPK值和存储路径,点击“生成UFPK密钥文件”。
DLM官网生成W-UFPK
详细步骤参考文档《Injecting and Updating Secure User Keys》章节:4. Wrapping the User Factory Programming Key Using the Renesas Key Wrap Service
封装AES密钥
详细步骤参考文档《Injecting and Updating Secure User Keys》章节:6.1 Wrap an AES-128 User Key Using the UFPK for RSIP-E51A Compatibility Mode
切换到密钥数据文件选项卡,输入明文密钥:000102030405060708090a0b0c0d0e0f
1.2DLM官网生成W-UFPK
详细步骤参考文档《Injecting and Updating Secure User Keys》章节:4. Wrapping the User Factory Programming Key Using the Renesas Key Wrap Service。
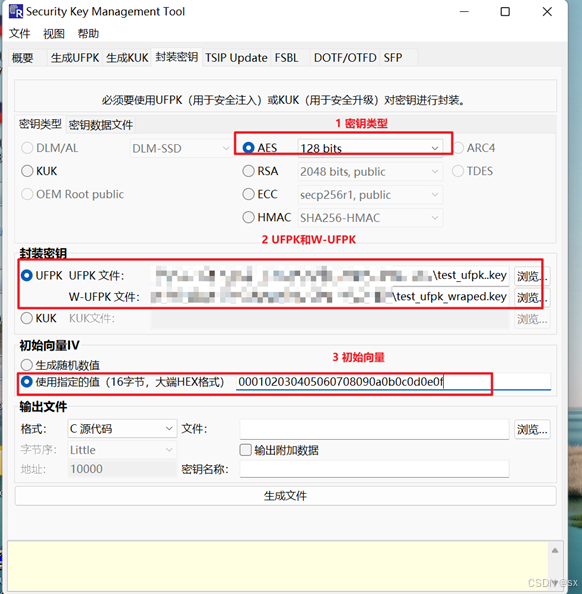
1.3封装AES密钥
详细步骤参考文档《Injecting and Updating Secure User Keys》章节:6.1 Wrap an AES-128 User Key Using the UFPK for RSIP-E51A Compatibility Mode。
图片
切换到密钥数据文件选项卡,输入明文密钥:000102030405060708090a0b0c0d0e0f。
1.4点击生成文件按钮
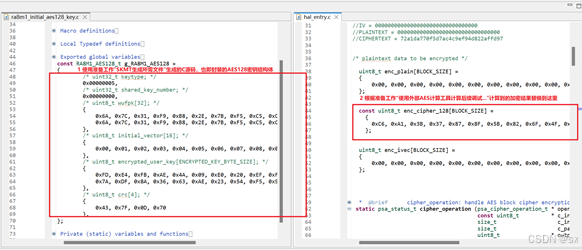
生成的封装AES密钥的结构体数据。
const RA8M1_AES128_t g_RA8M1_AES128 = { /* uint32_t keytype; */ 0x00000005, /* uint32_t shared_key_number; */ 0x00000000, /* uint8_t wufpk[32]; */ { 0x6A, 0x7C, 0x31, 0xF9, 0xB8, 0x2E, 0x7B, 0xF5, 0xC5, 0xCE, 0x0F, 0x66, 0x14, 0xCE, 0x63, 0x4C, 0x6A, 0x7C, 0x31, 0xF9, 0xB8, 0x2E, 0x7B, 0xF5, 0xC5, 0xCE, 0x0F, 0x66, 0x14, 0xCE, 0x63, 0x4C }, /* uint8_t initial_vector[16]; */ { 0x00, 0x01, 0x02, 0x03, 0x04, 0x05, 0x06, 0x07, 0x08, 0x09, 0x0A, 0x0B, 0x0C, 0x0D, 0x0E, 0x0F }, /* uint8_t encrypted_user_key[ENCRYPTED_KEY_BYTE_SIZE]; */ { 0xFD, 0xE4, 0xFB, 0xAE, 0x4A, 0x09, 0xE0, 0x20, 0xEF, 0xF7, 0x22, 0x96, 0x9F, 0x83, 0x83, 0x2B, 0x7A, 0xDF, 0x8A, 0x36, 0x63, 0xAE, 0x23, 0x54, 0xF5, 0x91, 0xC7, 0x03, 0x1B, 0x8A, 0x52, 0xB0 }, /* uint8_t crc[4]; */ { 0x43, 0x7F, 0x0D, 0x70 }, };
02使用外部AES计算工具计算后续调试过程的明文、IV、密文
百度搜索"AES在线加密"找到一个网页:https://www.lddgo.net/encrypt/aes。

除1、2、3、4外其他几项:
加密模式:CBC
填充:nopadding
密码格式、偏移量格式、输入格式、输出格式:hex
点击AES加密选项可知:
明文:
00000000000000000000000000000000
通过密钥:
000102030405060708090a0b0c0d0e0f
加密为:
c6a13b37878f5b826f4f8162a1c8d879
03 调试和结果确认
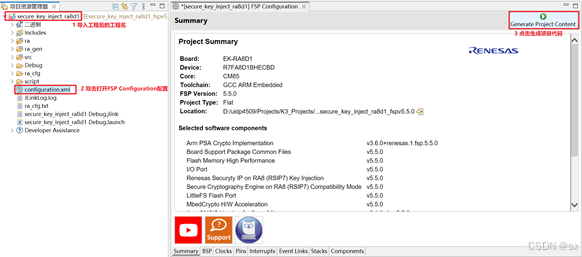
01 按3所述例程导入工程后生成代码
02将准备工作章节内容替换成我们的测试密钥和测试结果
03编译和调试
这个设置比较重要,未设置正确的话后续程序会HardFault,需使用集成到e2studio IDE的Renesas Device Partition Manager执行设备初始化。

具体过程:
选中“Initialize device back to factory default”
点击Run
取消选中“Initialize device back to factory default”
点击Run
确认打印以下内容:
Current status of the device
DLM state : Original Equipment Manufacturer (OEM)
Protection level (PL) : PL2
Authentication level (AL) : AL2
Secure/NSC memory partition size :
- Code Flash Secure (kB) : 16352
- Data Flash Secure (kB) : 63
END of current status of the device.

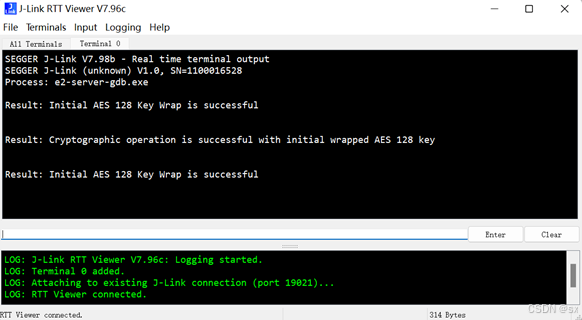
04跟踪程序或者打开J-Link RTT viewer V7.96观察程序的Trace输出
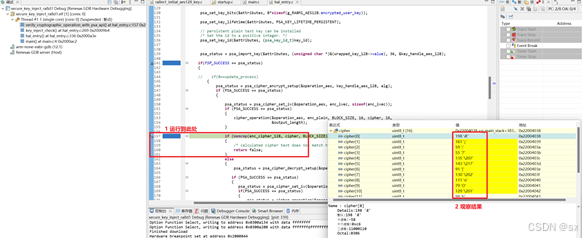
if语句时进入else表示与我们网页计算结果相同,程序密文如图调试结果显示数组。
04 总结
本次实践完成了RA8D1芯片AES密钥封装和芯片上加解密功能验证,后续可继续RSA、ECC、哈希等功能进行调试验证。
-
芯片
+关注
关注
455文章
50714浏览量
423159 -
瑞萨
+关注
关注
35文章
22308浏览量
86241
发布评论请先 登录
相关推荐

【瑞萨RA8D1 CPK开发板】RA8D1移植ThreadX操作系统
【瑞萨RA8D1 CPK开发板试用】开箱与点灯
基于Arm Cortex-CM85内核的RA8D1作为控制器 通过MIPI DSI实现LVGL显示
基于瑞萨电子RA系列的野火耀阳RA8D1开发板产品简介
《RA8D1 Vision Board开发实践指南》上线啦

【Vision Board创客营连载体验】RA8D1-Vision Board开箱使用
【Vision Board创客营连载体验】RA8D1 Vision Board Camera 初体验
【Vision Board创客营连载体验】RA8D1 Vision Board初体验
RA8D1 Vision Board上的SPI loopback测试
【Vision Board创客营连载体验】RA8D1 Vision Board上的SPI实践
瑞萨RA8D1 CEU介绍与使用说明


 工商网监
工商网监
评论