 OpenHarmony BLE蓝牙连接教程
OpenHarmony 蓝牙模块提供了基础的传统蓝牙能力以及 BLE 的扫描、广播等功能。
这里将介绍如何通过 OpenHarmony 提供的 @ohos.bluetooth (蓝牙接口)打开当前设备的蓝牙,关闭蓝牙,以及连接 BLE 蓝牙设备。
设备与环境:
设备:九联 s905l3a 机顶盒、开鸿智谷学生卡 BLE 蓝牙设备
系统:OpenHarmony 3.2 beta2
SDK:9
逻辑流程
首先机顶盒在开始的时候获取蓝牙相关权限,然后通过 OpenHarmony 提供的蓝牙接口打开蓝牙。

接着订阅发现 BLE 设备发现事件,然后通过 OpenHarmony 提供的蓝牙接口开启 BLE 设备扫描。
当发现到了 BLE 蓝牙设备后,进行上报,BLE 设备发现事件触发,获取到来自 BLE 设备的广播信息包,然后进行 BLE 蓝牙连接。
实现过程
①获取蓝牙相关权限
在使用蓝牙接口之前,首先要让设备获取一下权限:
ohos.permission.USE_BLUETOOTH //:允许应用查看蓝牙的配置。
ohos.permission.DISCOVER_BLUETOOTH //:允许应用配置本地蓝牙,查找远端设备且与之配对连接。
ohos.permission.LOCATION //:允许应用获取设备位置信息。
ohos.permission.MANAGE_BLUETOOTH //:允许应用配对蓝牙设备,并对设备的电话簿或消息进行访问。
打开 DevEco Studio 3.1.0.200,创建新的 Stage 项目,在项目中的 module.json 文件中添加相关权限:
"requestPermissions":[
{
"name":"ohos.permission.USE_BLUETOOTH",
"reason":"$string:grant_use_bluetooth",
"usedScene":{
"abilities":[
"MainAbility"
],
"when":"inuse"
}
},
{
"name":"ohos.permission.DISCOVER_BLUETOOTH",
"reason":"$string:grant_discovery_bluetooth",
"usedScene":{
"abilities":[
"MainAbility"
],
"when":"inuse"
}
},
{
"name":"ohos.permission.LOCATION",
"reason":"$string:grant_location",
"usedScene":{
"abilities":[
"MainAbility"
],
"when":"inuse"
}
},
{
"name":"ohos.permission.MANAGE_BLUETOOTH",
"reason":"$string:grant_manage_bluetooth",
"usedScene":{
"abilities":[
"MainAbility"
],
"when":"inuse"
}
}
]
②打开设备的蓝牙
首先,通过调用 bluetooth.getState()蓝牙接口来获取当前设备蓝牙是否打开,并设置蓝牙开关的标识位 isOn。
asyncaboutToAppear(){
//等待获取蓝牙权限
awaitglobalThis.abilityContext.requestPermissionsFromUser(['ohos.permission.USE_BLUETOOTH','ohos.permission.DISCOVER_BLUETOOTH','ohos.permission.LOCATION','ohos.permission.MANAGE_BLUETOOTH'])
logger.info(TAG,`获取权限grantPermission,requestPermissionsFromUser,PermissionRequestResult`)
//获取蓝牙状态
letstate=bluetooth.getState()
//判断当前设备蓝牙是否打开
if(state===bluetooth.BluetoothState.STATE_ON){
this.isOn=true
}
if(state===bluetooth.BluetoothState.STATE_OFF){
this.isOn=false
}
}
如果当前设备蓝牙未打开,则通过调用 bluetooth.enableBluetooth()蓝牙接口来打开蓝牙。
//打开蓝牙函数
initBluetooth(){
this.enable=bluetooth.enableBluetooth()
//判断蓝牙是否成功打开
if(this.enable==true){
prompt.showToast({
message:'Openbluetooth'+this.enable,
duration:2000,
});
}
}
③注册发现 BLE 设备监听器
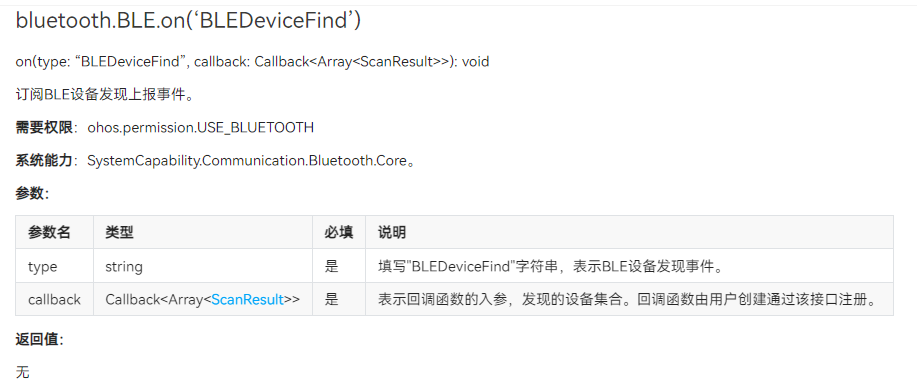
在设备打开蓝牙之后,通过调用 bluetooth.BLE.on('BLEDeviceFind')蓝牙接口来订阅 BLE 设备发现上报事件。 该接口参数如下:
通过注册发现 BLE 设备监听器,可以得到发现设备的集合,BLE 设备的广播包、地址、信号强度 rssi。
在这里发现获取连接 BLE 设备名字的接口 getDeviceName 无法成功调用,所以自己通过解析广播包来获取设备名字。
//订阅BLE设备发现上报事件
//获取到的data包括BLE设备的广播包、地址、信号强度rssi
bluetooth.BLE.on('BLEDeviceFind',(data)=>{
logger.info(TAG,`enteronbluetoothBLEDeviceFind`)
logger.info("rgytl 开始扫描设备地址! 1")
if(data!==null&&data.length>0){
logger.info("rgytl 开始扫描设备地址! 2")
if(this.discoveryBleList.indexOf(data[0])===-1){
//把发现的设备地址存入列表
this.discoveryBleList.push(data[0].deviceId)
logger.info("rgytl----discoveryBleList="+JSON.stringify(this.discoveryBleList))
//读取广播包,解析广播包,得到设备名字,并存入设备列表
vari=0;
varx=data[0].data[i]
vary=data[0].data[i+1]
while(y!=0x09&&i+x+2
④开启 BLE 设备扫描
在完成订阅 BLE 设备发现上报事件后,通过调用 bluetooth.BLE.startBLEScan 接口去开启 BLE 设备扫描。 通过该接口,可以对扫描 BLE 设备进行过滤,可以过滤的参数有:BLE 设备的地址、名字、以及服务的 UUID 等。

在这里,我设置只扫描包含我 BLE 设备名字的 BLE 设备,这样子就不会说扫描到一大堆其他的 BLE 设备,影响使用,只需要开启一次扫描和订阅一次 BLE 设备发现上报事件就可以了,使用的时候只要没有关闭,就不需要重复调用。
//设置蓝牙BLE扫描模式(根据名字扫描)
bluetooth.BLE.startBLEScan(
[{
deviceId:null,
name:"bleslavetest",
serviceUuid:null
}],
{
interval:0,
dutyMode:bluetooth.ScanDuty.SCAN_MODE_LOW_POWER,
matchMode:bluetooth.MatchMode.MATCH_MODE_AGGRESSIVE,
}
)
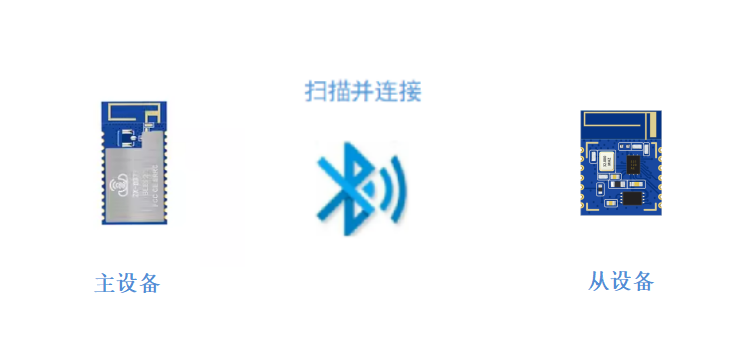
⑤连接 BLE 设备
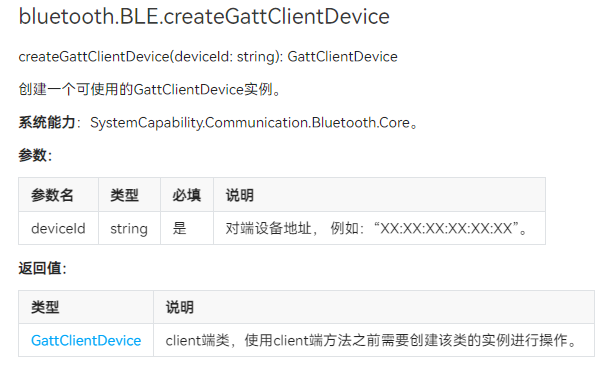
在扫描到 BLE 设备之后,可以通过 on(‘BLEConnectionStateChange’)来订阅获取 BLE 设备的连接状态变化事件。 在使用该接口之前,要先通过 bluetooth.BLE.createGattClientDevice('XXXXXX:XX')接口创建一个可使用的 GattClientDevice 实例。
//订阅BEL状态变化
if(this.BleOnflag){
//只创建一个GattClient对象
this.BleOnflag=false
this.BLEDevice=bluetooth.BLE.createGattClientDevice(item);
//订阅获取BLE设备的连接状态变化事件
this.BLEDevice.on('BLEConnectionStateChange',(data)=>{
console.log('bluetoothconnectStatestatechanged');
letconnectState=data.state;
//根据不通的连接状态,提示不同的信息
if(JSON.stringify(connectState)==0){
logger.info(`connectState=${JSON.stringify(connectState)},断开连接`)
prompt.showToast({
message:'断开连接',
duration:2000,
});
}elseif(JSON.stringify(connectState)==2){
logger.info(`connectState=${JSON.stringify(connectState)},连接成功`)
prompt.showToast({
message:'连接成功',
duration:2000,
});
}elseif(JSON.stringify(connectState)==1){
logger.info(`connectState=${JSON.stringify(connectState)},正在连接`)
}else{
logger.info(`connectState=${JSON.stringify(connectState)},正在断连`)
}
logger.info(`connectState=${JSON.stringify(connectState)}`);
})
}
在前面通过 bluetooth.BLE.createGattClientDevice(item)创建一个 GattClientDevice 实例 BLEDevice 后,我们可以通过该实例去调用 connect()方法连接 BLE 设备。
注意,GattClientDevice 实例只需要创建一个就可以。

//连接蓝牙
letBLEConnect=this.BLEDevice.connect()
//如果连接成功,则把BLE设备存入连接成功列表
if(BLEConnect){
this.deviceBleList.push(item)
}
⑥结尾处理
当不连接 BLE 设备的时候,要记得关闭 BLE 设备扫描,取消订阅设备发现事件。
取消 BLE 设备连接,通过之前创建的 GattClientDevice 实例 BLEDevice 调用 disconnect()方法断开连接 BLE 设备。
Button("断开")
.alignSelf(ItemAlign.Center)
.onClick(()=>{
AlertDialog.show({
title:$r('app.string.disconnect'),
message:'此操作将会断开该设备的连接',
primaryButton:{
value:$r('app.string.cancel'),
action:()=>{
}
},
secondaryButton:{
value:$r('app.string.confirm'),
action:()=>{
//断开连接BLE设备
letBLEdisConnect=this.BLEDevice.disconnect()
if(BLEdisConnect){
logger.info(`connectStateBLEdisConnect=${JSON.stringify(BLEdisConnect)},断开连接`)
//移出BLE设备连接列表
this.deviceBleList.pop(item)
}
}
}
})
})
在断开连接、关闭蓝牙之后,可以通过 off(‘connectStateChange’)取消订阅 BLE 连接状态变化事件、bluetooth.BLE.stopBLEScan 停止 BLE 扫描、以及 bluetooth.BLE.off(‘BLEDeviceFind’)取消订阅 BLE 设备发现上报事件。
最后通过 bluetooth.disableBluetooth()关闭蓝牙:
.onChange((isOn:boolean)=>{
if(isOn){
this.isOn=true
this.initBluetooth()
}else{
this.isOn=false
bluetooth.BLE.off('BLEDeviceFind',()=>{
logger.info("rgytl 取消BLE设备发现订阅!")
})
bluetooth.BLE.stopBLEScan()
this.disable=bluetooth.disableBluetooth()
this.discoveryList=[]
this.BleInfo=[]
this.BleRssi=[]
if(this.disable==true){
prompt.showToast({
message:'Closebluetooth'+this.disable,
duration:2000,
});
}
}
})
审核编辑:汤梓红
-
接口
+关注
关注
33文章
8580浏览量
151029 -
BLE
+关注
关注
12文章
660浏览量
59392 -
蓝牙模块
+关注
关注
30文章
573浏览量
55726 -
SDK
+关注
关注
3文章
1035浏览量
45905 -
OpenHarmony
+关注
关注
25文章
3716浏览量
16260
原文标题:OpenHarmony BLE蓝牙连接
文章出处:【微信号:gh_834c4b3d87fe,微信公众号:OpenHarmony威廉希尔官方网站 社区】欢迎添加关注!文章转载请注明出处。
发布评论请先 登录
相关推荐
BLE多连接威廉希尔官方网站 对比与应用
经验分享:如何选择适合的BLE蓝牙模块
如何利用API增加BLE连接性
BLE蓝牙的角色功能
盘点BLE低功耗蓝牙和传统蓝牙之间的五大区别
BLE蓝牙的具体优势以及BLE蓝牙智能门锁的应用

蓝牙和BLE(低功耗蓝牙)的区别是什么
蓝牙模块有哪些种类?BLE低功耗蓝牙模块有什么特点?
Telink BLE多连接应用的SDK简介
BLE蓝牙模块功能应用②——定位功能

带你深入了解BLE蓝牙模块工作模式


 工商网监
工商网监
评论